Bill shares his overall story to help amputees learn what they need to know before or after their leg amputation. His recreational therapy section discusses his swimming with shinfinTM fins, which he expands upon in swimming with fins after amputation. Bill’s story encourages above knee amputees, below knee amputees and foot amputees to (re)learn how to swim after amputation.
Bill’s review from O’Fallon, USA
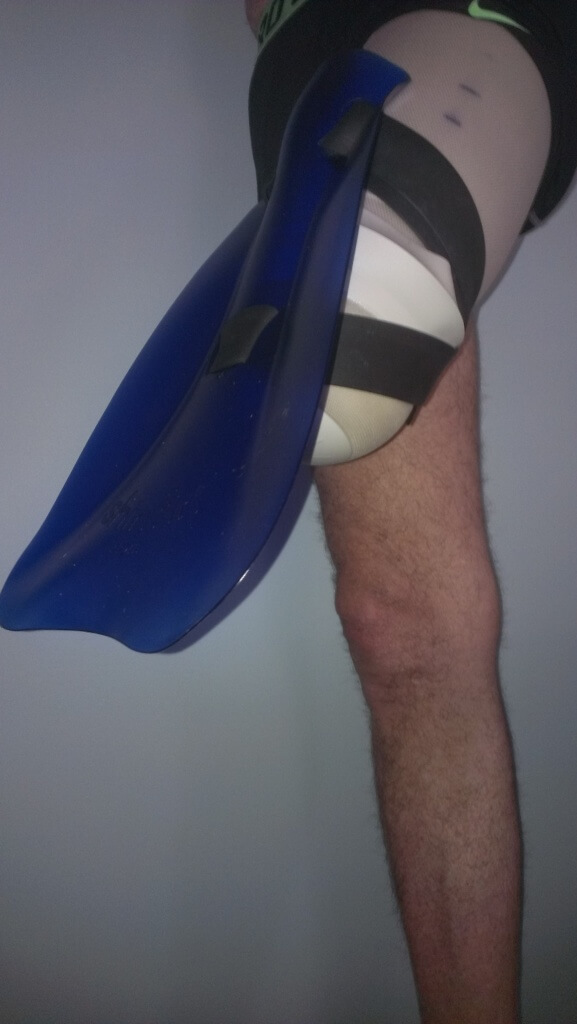
“I learned that swimming helped me regain my strength and endurance. I use a shinfinTM fin on my remnant leg and also on my good leg to give me speed and a good workout. The shinfinTM fins can also be used for BKAs. Using the shinfinTM fin on my remnant leg strengthened and helped remove the excess fluids. I also wear my liner for comfort and it gives the shinfinTM fin more grip to stay on.”
Bill’s review: Stuff you need to know before or after leg amputation
by William A. Wiegand, Jr.
“I would like to dedicate this pamphlet to all who have supported me during my recovery. To my loving wife Kathleen, thank you for all your mental and physical support. To the St. Louis Veterans Administration doctors, nurses, therapists and volunteers, thank you for your tireless support in my rehabilitation. To my prosthetist, thank you for the many hours you have spent with me teaching me how to walk correctly. And to the National Veterans Administration for providing veterans the opportunity to attend the National Sports Clinics which have been such an emotional and physical healing activity.
March, 2015
All rights reserved. No part of this pamphlet may be reproduced or transmitted in any form or by any means without permission of the author.”
Preface
“This pamphlet was written to help you through the learning stages of being a new leg amputee. My name is Bill Wiegand and I’m an above knee amputee also known as AKA. Amputees who have lost their legs from the knee down are known as below knee amputee or BKA. I lost my leg in June 2012 due to an infection. My knowledge of prosthetics was very limited, you could almost say I had no knowledge. There was no overall description of what was happening to me, what products I would need and most importantly no time table of when I would be back on my feet. It seemed like I learned most of this information by watching it happen and I want you to have some understanding of what to expect. Most of my information relates to AKA. The main difference is that BKAs retain their knee joint and recover faster. They also have less restrictions on what they can do. The AKAs use a mechanical knee. I hope this pamphlet is informative to you and you gain a general understanding of events.”
Contents
- Hospital Experience
- Caregiver
- Phantom Pain
- Emotionally and physically accepting the loss of a limb
- Choosing a prosthetic leg
- Wearing a prosthetic leg
- Walking and standing
- Dressing your leg
- Exercise
- Diet
- Being domestic
- Driving
- Recreational therapy
- In conclusion
Hospital experience
“The most terrifying experience is when they tell you that they will not be able to save your limb and they must amputate. They determine this by examination, blood tests and X-rays. Next they come into your room and have you sign an operation consent form and they take a Sharpie pen and mark your limb for removal. Soon you are in transit to the operating room. The anesthetic takes over and you are asleep. When you awake you slowly realize you have lost your limb or limbs. You can’t tell it with the warm blanket covering you because you can still feel your limb. You soon learn that the removal does not remove the sensation of that limb. It still feels like it’s there. In my case, I could still move my missing leg and wiggle my toes. It sounds impossible that this would be the case, but it is. It seems like all amputees feel their missing limbs. I’m glad that that is the case. Even though it’s not there, I still like wiggling my missing toes. It can even itch and you will try to scratch a leg that is not there.”
Caregiver
“Having a caregiver is very crucial to your recovery. I am very thankful to my wife for all her care during my recovery. I was very limited on what I could do for myself and depended on her assistance for almost everything. You will discover that the loss of a limb is very physically challenging, but the mental aspect is even harder to deal with. Your caregiver will play a very important role in your recovery and they will go through the emotional battles with you. You have to become strong yourself physically and mentally and support each other. The journey is not easy, but you will succeed. I guess I’m trying to make the point that it’s not just you going through this experience, it’s your caregiver too. So support each other and both of you will win the battle.”
Phantom pain
“One of the things you learn about is what’s called “phantom pains”. Why is it called phantom is because the removed limb is in pain. Not at the point of removal, but all up and down the removed limb. The pain can become very severe and cause you to jump. I would describe it as a quick jabbing pain that usually doesn’t last too long at one time. I understand that the nerves are reestablishing themselves. The good news is that as time goes on, the pain seems to diminish.”
Emotionally and physically accepting the loss of a limb
“The most challenging aspect of this journey is maintaining your will to live. You have to fight for every step you take. I stayed in the hospital for approx. 2 ½ weeks after the operation. Then I was transferred to a physical and occupational therapy facility. At this point my means of moving was with a wheelchair with someone pushing me. I would have physical therapy which included exercises for my remnant leg and occupational therapy for my upper body. I looked forward to this activity every day. Don’t be surprised if your remnant leg jumps involuntarily when you move it. The nerves have gone through shock after being cut and will take some time to heal. I could never give enough thanks for my therapists’ support. After about 2 ½ weeks of therapy I was sent home to recover. At this time I was given a wheelchair and a walker to take home. A shower chair was also provided along with a handicapped toilet seat and side rails. My wife would help me in and out of the shower. This may not seem difficult, but it was quite challenging to get up over the shower threshold. Most of my day was spent laying in the bed or sitting in a chair. I’m not sure what I would have done without my wife’s support. I was unable to dress myself, feed myself, bath myself or drive myself to the therapy and doctor appointments. I was also given a shrinker to wear at night. It is a cone shaped elastic sock with a waist band that you wear at night to reduce the swelling in your leg. I wore the shrinker for about a year. Don’t be concerned when your skin is all winkles, the fluid is still leaving and the skin will continue to tighten up. Your stitches will come out in approx. 2 months after your amputation.”
“In approx. 3 ½ months after the amputation I returned to physical therapy and occupational therapy. By this time I was walking with a walker. Moving on one leg and sliding the walker was now my means of locomotion. Not the best means of moving, but a lot better than sitting in a wheelchair. A casting of my remnant leg was made earlier and my new leg was waiting for me at the VA. This was the turning point I had been waiting for. Just the idea of being able to walk halfway normally was overwhelming. My adventure started out by walking with the leg and the assistance of the parallel bars. As they say, one foot in front of the other. Occupational therapy consisted of learning to stand up behind a table and function, which was not that easy to maintain your balance. I was there for another two weeks learning how to stand and walk with my new leg. At the end of that period I had learned how to walk with a cane in the hallways in physical therapy and how to adapt to cooking plus additional exercises in occupational therapy. My next agenda was becoming an outpatient for physical therapy. This went on for several months. I can remember the difficulty of walking on the handicapped ramps as far as having enough strength to walk up the slopes.”
Choosing a prosthetic leg
“The choice is usually made by others. Your health care provider will determine what type of prosthetic you are eligible for based on your insurance plan. Your recovery and participation in therapy classes and meetings show your willingness to return to an active life style. I have heard stories about amputees who get a leg, give up on learning how to use it and the leg ends up in the closet. As you can tell from my earlier writings, it takes a lot of work to return to a normal life. I cannot stress enough how important it is for you to take the necessary steps to succeed.”
“AKA legs work by controlling the amount of hydraulic fluid released at one time. They can be either basic hydraulics working in a piston or computer controlled pistons. It’s obvious that the units controlled by a computer are far superior plus a lot more expensive. Sensors transmit information to the microprocessor which tells the knee how to function. Your normal gait has two phases known as “stance” and “swing”. The “stance” phase is the time when your foot is on the ground carrying your weight and the “swing” phase is when your foot is in the air and swinging forward. The knee stores up the hydraulic energy and mimics the function of your normal knee to provide stability. The best thing it does is to prevent you from falling. The hydraulic action slows down and the knee becomes stiffer if you are walking downhill or siting down and it also speeds up if you are walking faster. It took me a while to get confident that the leg would not buckle. It’s great for walking down the slopes on the golf course or going down a handicapped ramp. Some of the microprocessor knees have a key fob which allows you to change the settings on the knee for different activities.”
“The one piece of hardware I would recommend is a rotating angle or a rotator on top of the knee. I use a rotating angle to help me swing the golf club. Whether you play golf or not, the rotator helps prevents rubbing the groin area. There are so many different types of legs for different applications. I have a second leg which is called a river leg. As the name implies, it can get wet. I use it for the kayaking trips or walking in the water. It has no electronics to be damaged.”
“BKA legs have a socket with a foot and more sophisticated ones have a microprocessor controlling the bending of the ankle.”
“Ask your prosthetist for guidance. Explain to him what goals you want to reach and ask as many questions as you can.”
Wearing a prosthetic leg
“Learning how long to wear a prosthetic is very important. I was told that it normally takes between 9 to 15 months to walk efficiently for an AKA and that has proven to be the case. When I started wearing the leg I wore it for 1 hour in the morning and 1 hour in the afternoon. The rule was to increase my time by 30 minutes each week. This worked for me without creating any skin rashes and I would definitely recommend this to others.”
“It seems like most amputees start out with a socket which uses a Velcro strap that is attached to your liner. A liner is a rubber like sock that fits over your remnant limb which has a fastener at the end for attaching a Velcro strap to. The strap extends through the bottom of the socket and sticks to the Velcro on the outside of the socket. It seems like a crude way of holding your leg on, but it works. The reason you use this system first is due to your remnant leg changing volume. Your limb will be losing volume (fluids) and this system allows you to add socks to your leg (similar to tube socks) to increase the diameter. Your remnant limb is now cone shaped and you must compensate by adding socks. Single ply socks will increase your diameter about 1/8”. There is a limit to how many socks you can use. I never go over six single plies. You can even get 3 ply socks. After that it’s time to have your prosthetist add filler to your socket. Filler is thin layers of leather or similar material glued and sanded to the inside of the socket. The size reduction of your limb will continue for quite some time. I believe it was around eight months that my first socket had to be replaced because of my remnant leg size. My next socket was a vacuum type which held the leg on by suction. You will like this a lot better, no strap to deal with. Although it’s been a while, I’m still going back to have the socket reshaped. Just not as often. I’m on my third socket now and the leg seems to be stabilizing in size. Most of the BKA sockets I have seen use a notched steel pin attached to the liner that clamps in the socket.”
“Learning how the socket works is your key to a good fit. It is very frustrating having your limb not fitting properly. Think of your remaining limb as being cone shaped. The weight of your body is carried by the sides of the cone, not by the end of the remaining limb. Your first inspection should be to determine if the remnant limb is setting all the way down in the socket. If it is not, adding socks will only raise it higher and create additional problems walking. You may say that it is wobbling around at the base, but is it? It could be that you have gained diameter in your limb and its lifting you out of the socket. If this is the case, only your prosthetist can remove padding or stretch your socket. We all want to walk comfortably without this hassle, but it just doesn’t seem to work that way. The laws of physics always win. When all your efforts fail, see your prosthetist.”
“One of the common problems with sockets for above knee amputees is that they rub your groin area and may have too much pressure on your pelvic bone. I use a prosthetic lotion (lubricant) in my groin area to help prevent this from happening. As I mentioned earlier, the rotator ankle helps a lot to prevent irritation. I also inform my prosthetist of any discomfort I’m having. As you lose mass at the end of your limb, the leg falls deeper into the socket and puts more pressure on the groin area and the pelvic bone. I have discovered that the liner can trick you into believing that the socket is too tight. The liner will have a tendency to overlap itself in these areas and thus cause irritation. Simply put your fingers into this area and straighten your liner. I typically adjust the liner twice while sliding the socket on. Do not get disappointed in your leg and stop wearing it. Have your prosthetist fix the problem and enjoy your mobility. When you get to this point you have won the emotional battle and are now ready to take back your life. It’s time to shed those thoughts that tell you that you are limited in what you can do. Prove it to yourself and other amputees will follow your lead.”
“You will discover that when you take your leg and liner off at the end of the day or whenever, you will have the tendency to want to massage your remaining limb. This is normal and it promotes good blood circulation and relaxes the muscles. I still do it, although not as much. One thing that you never want to do is shave the hairs around your groin area to prevent the liner from pulling them. This will promote ingrown hairs which will be very painful and could cause infection. If you notice any skin problems you must contact your prosthetist and/or your doctor. I have heard of too many amputees putting up with the discomfort and then having to go without their leg for many weeks while the area heals. Be wise and don’t allow this to happen.”
“If you have a microprocessor leg, it will need to be plugged in for recharging overnight. Some of the newer units may go several days before needing to be recharged. Some microprocessor legs will go into their default mode if the battery loses it charge. This mode is a no flex, stiff legged position which will safely keep you from falling. All prosthetics are different, read your manual.”
Walking and standing
“As I mentioned earlier your first experience in relearning how to walk with a prosthetic will be with parallel bars, a walker and then with a cane. Once you have mastered these, it’s time to get serious and start walking without mechanical assistance. During my last few weeks in physical therapy they had me standing while catching a rubber ball. My therapist was at my side to catch me if I lost my balance. This is your start in becoming independent.”
“My first step in walking without a cane was at home walking up and down the hallway. If you lose your balance the wall is close enough that you can catch yourself. I’ve bounced off the walls quite a bit while taking these first steps. You will find that carpet is more difficult to walk on than a hard surface. The fact that it is a soft material and not rigid makes it more difficult to walk on and sometimes it will grab your foot if you don’t lift your leg high enough. Once you master the carpet, the hard floors seem easy. To make the job of walking in the hallway a little more fun, I brought my putter out and hit golf balls into a cup. This also taught me how to bend down to retrieve the balls. The putter also came in handy as a cane when needed. With a lot of hall walking you will become confident and expand into other rooms.”
“Your rhythm is a key factor in walking. Allow the prosthetic to extend behind you as far as possible. This will feel unnatural at first. You will need to stretch those gluts to a point where it seems overdone. Keep in mind that these muscles haven’t been used in a while. Step forward on your heel, but not too far. Allow your remnant leg muscles to push you through to ending up on the ball of your prosthetic foot. Once the pressure from your weight leaves your foot your knee will bend and you start the stride again. You are in rhythm when the motion is smooth. Both legs should extend out the same amount, front and back. You will find out that longer strides help keep you from wobbling and you can keep up with the crowd. Your prosthetist will adjust the microprocessor to give you a smooth gait. There are many settings and your prosthetist will explain them to you.”
“Associated with walking is going up and down steps. Always make sure a hand rail is available or something to grab on to. Walking down steps can be accomplished in two ways. You lead with the prosthetic by placing it firmly on the lower step. Your good leg bends at the knee to lower you down and then you let the good leg down to the same step and then repeat the process. There is another way of getting down the steps if you have a microprocessor leg. You extend the prosthetic leg so that the foot is overhanging the stair tread about 2/3rd and allow it to pivot. Now you can walk on each stair tread. The process for going up is normally one step at a time, leading with your good leg first. Some of the microprocessor knees will allow the knee to bend as you climb the steps. This takes a lot of strength for your remnant leg to lift you. Whether it is steps or curbs, the prosthetic leads when going down and your good leg leads when going up. Your physical therapist will show you how to climb steps and how to get over curbs.”
“It is very important that you learn how to properly stand. My prosthetist told me that learning how to stand was the most important part of learning how to walk. Standing teaches you about balance. With a prosthetic it must be kept at all times directly under you, not in front of you. You must have at least 60 percent of your weight on it. This does two things – it puts less strain on your good leg and it tells the microprocessor to remain in the stiff leg position. The leg could buckle if you carry most of your weight on the good leg. It’s designed this way to allow the knee to bend for walking. I found that standing up behind the sink counter was one of the best teachers. You feel secure because the sink is close enough to grab if you lose your balance. How many of us would have ever thought of a sink as being a balancing tool? Whether you are brushing your teeth, combing your hair, shaving or putting your war paint on (as my wife calls her makeup), you are reestablishing your balance. Instead of sitting down to watch TV, try standing up. Make sure that your seat is behind you in case you lose your balance.”
“You want your prosthetist to be a stickler on perfecting your gait. Once you get to the point of walking without a cane you have to be careful not to pick up any bad habits. The basics as mentioned above are to load weight on your prosthetic, do not overextend it and maintain good posture. When you start dropping a shoulder as you are walking, you’re doing it wrong. You will have to retrain your brain on how to walk. I found it very helpful to have my wife critique me while walking in the house or outside. Walking on the grass will be one of the best teaching tools for a good gait and balance.”
“I’ve taken several falls while learning how to walk with a prosthetic leg. Some falls were controlled and others were not. Controlled falling is only achieved by learning how to fall if you lose your balance. Falling forward seems to be the best way to go. You can normally catch yourself with your hands as you lean forward while stooping down. Getting up from that position is also easier. The main thing is not to panic! Your brain still thinks it has a working knee that will keep you from falling. Once your prosthetic knee starts bending, there is nothing you can do other than bend the good knee along with it and lean forward. Its best to have your prosthetic knee hit the ground first to protect your good knee. The one thing you don’t want to do is to ride your prosthetic knee down while keeping your good leg straight. Your microprocessor knee will give you resistance only to a certain angle and then it has no resistance. I have taken this ride a few times and it only ends up bad. When you fall on your prosthetic leg side you try to overcorrect it with a knee that isn’t there and this adds extra stress to your remaining remnant leg muscles. You have no other choice but to catch yourself with your arm on your prosthetic side and then you slam your body on the hard surface below. So now you have multiplied the points of bodily harm. I don’t want to scare you, but learn how to fall correctly to eliminate any setbacks in your walking. Take shorter steps on your prosthetic side when going up or down sloped surfaces or on uneven or slippery surfaces. I wish there was a practice area for falling, but I’m not aware of any. The only idea I had which would probably be fun is having your friends take you to a kid’s bounce house and have them try to push you over. Just an idea, but it could be fun! The best thing of course as we know is not to fall at all.”
“Every one of us has memorable moments when we conquer a challenge. Our challenge is walking again, and walking so well that people don’t know we are wearing a prosthetic.”
Dressing your leg
“The order of events for getting dressed will change if you are an AKA. I thought I was going to be able to leave my leg by the bed and then just hop into it. That’s not quite the case. First of all you must put the liner on. The liner is cut by the prosthetist to fit tightly to your groin area and must be located on your leg exactly. The liner is turned inside out first and then rolled up your remnant leg. Make sure it is properly aligned. Now you are ready to get dressed. The easiest way I have found to get dressed is to dress the leg first. That means sliding your slacks over your prosthetic first and then putting your shoe on it. The shoe will not slide down the pants leg when attached to the prosthetic. The next step is to slide your good leg into the slacks and then put on your shoe. Now we have one prosthetic leg in one pants leg and the good leg also. The top of the slacks are now by your knees on both legs. Now comes the job of getting the prosthetic on. At this point I’m sitting in the chair with the walker in front of me. You will probably have the Velcro style socket and will have to push the strap into the bottom of the socket and pull the strap as tight as possible and Velcro it to the side of the socket. You should now stand up with the help of the walker, bounce on the leg some and then retighten the strap. Do not tighten your remnant leg muscles when putting your socket on, put relax them. Let your weight push your leg into the socket and then lightly bounce on it. Tight muscles will prevent your leg from reaching the bottom of the socket. Now you can pull your pants up. When you change sockets to a vacuum type this will save some time. With the vacuum type you add sanitizer to the end of the liner for lubrication and then slide into the socket. It still takes some bouncing on the leg to get it to the bottom. Shorts and sweats with zippers at the end of the leg can usually be done without dressing the leg first. It’s not an easy job to bend your waist after your prosthetic is on and then try to put on your pants.”
Exercise
“My day normally starts at 5:00 AM. I get out of bed using the walker and move toward my chair, also in the bedroom. Next I let myself down to the chair and then to the carpeted floor where I lay down on the floor. Next to me are some weights laying on the floor – 5, 10, and 15 lb. weights. I start my exercises out by doing leg lifts of various types. Usually 60 repetitions per exercise and I do them for approx. 30 minutes. Most of the exercises were learned from physical therapy and I also made some up myself. I can only do stomach crunches instead of sit ups because I do not have enough weight with one leg to lift my upper body. After the leg lifts and stomach crunches I start lifting the weights. The 5 lb. weights are used to loosen me up. I use the 10s for repetition lifting and the 15s for a serious workout. I still have a long way to go. I use to lift 30 lb. weights with no problem. My goal as well as yours should be to regain your core strength and hopefully exceed it. Compensation for loss of leg strength needs to be made up by increasing your upper body strength. I normally lift weights about 45 minutes so the average exercising time is around 1 hour and 15 minutes. Usually after I finish with these exercises I head to the VA for activities. If I’m swimming or kayaking I pass on the weight lifting in the morning and normally skip the workout on Sunday. Whatever exercises you do will speed up the healing process. I started with 2 lb. weights and worked up to the repetitions. Repetitions are more important than lifting heavier weights.”
“For the first year you will want to wear your shrinker while doing the leg exercises. The shrinker will tighten your remnant leg and limit your muscle movement. With all the excess fluid and untoned muscles your leg feels like Jell-O sloshing from side to side. When your leg tightens up you can then exercise without the shrinker.”
Diet
“Diet is very important to amputees. The laws of physics take over again. Remember what we learned in high school that every force has an opposite force equal to it, or something like that. In simple terms, the more you weigh, the more work your good leg has to do. It’s already working overtime, so why give it extra stress. I believe that most of us feel better and move easier when that belly doesn’t extend over the belt. Diet and exercise go together. You should also include smoke free as part of your diet, few athletes smoke.”
Being domestic
“Cooking is much more than the preparation of food. It is learning how to walk in a confined space. I first started out sitting on a bar stool slicing vegetables. Later I leaned my body into the countertop while having the cane on my side. Finally comes the realization that you can walk without the cane. You can do a side step along the counter, walk from the counter to the refrigerator, to the stove, and so on. You can prepare food while standing up and not leaning on the countertop. The most challenging job is probably loading and unloading the dishwasher, and then you have to set the utensils in the draws and the plates, etc., in the cabinets. This is an excellent way to gain your balance back and it doesn’t hurt your spouse’s feelings if you share the work.”
“Another household duty that is great for balance is pushing the vacuum cleaner. I started out pushing it while holding on to the walker. It sounds easy, but for me it was difficult to push and maintain my balance. After becoming steadier I changed to the cane. There is a point where the vacuum cleaner becomes your cane and after that you are pushing it normally.”
“Whatever work you use to do you will be able to do again. Your method may be different but you will succeed in the task. Don’t be frustrated at the time it took you to finish. You will discover that the more you do that chore, the faster you become at it. What seems to be the impossible will become the possible. Don’t limit your chores for inside only.”
“Gardening and cutting grass are great exercises in mobility. Gardening is a real test for your ability to get up and down. Working from your knees is very challenging and sometimes I will just sit on my bottom with my legs straight out. Cutting grass is similar to pushing the shopping cart around and being self-propelled helps a lot. When I first tried it, the lowest speed was almost too fast. You will learn how to extend your stride just to keep up with the mower. As with the shopping cart, the mower acts as your balance and if you get in trouble, just disengage the self-propel.”
Driving
“What a feeling of freedom when you can drive yourself. I can still remember that day. I drove to the prosthetist to have my socket readjusted. My wife had been driving me around for about six months. My next adventure was to go to the grocery store by myself. I was still using the cane, but it felt great! Being an AKA and walking behind a cart is a new experience. I kept hitting the cart with my prosthetic leg as I pushed it. I was taking too long of a step with the prosthetic and too short of one with the good leg. Pushing a grocery cart is a great training tool for proper walking. The cart is heavy enough that you can use it as balance and improve your gait. So there I was, groceries and my cane in the cart going up and down the aisles. Reaching for groceries while holding on to the shopping cart is quite an experience. Even pulling your billfold out is challenging because it takes two hands to open it up. I’m happy to say that those days are over with and now I walk without the cane and shop like all the other customers. So I would highly recommend pushing grocery carts around, plus you get to do something that you use to do.”
“If your prosthetic is on your right side, you will have to make some mechanical changes to your vehicle. An additional accelerator can be positioned to the left side of the brake. Hand controls are another option.”
Recreational therapy
“Your next step is to get in touch with your recreational therapist. They will outline an activity schedule for you. I started out doing my exercises at home and swimming at the pool. Fall was on its way and our pool was closing. The VA had an inside pool and my recreational therapist signed me up for swimming. What I didn’t know was that there were many other sport activities that I could sign up for. I learned that swimming helped me regain my strength and endurance. I use a shinfinTM fin on my remnant leg and also on my good leg to give me speed and a good workout. The shinfinTM fins can also be used for BKAs. Using the shinfinTM fin on my remnant leg strengthened and helped remove the excess fluids. I also wear my liner for comfort and it gives the shinfinTM fin more grip to stay on. Without the fin there is no resistance. I also started playing golf and this has helped me with my balance. My instructor held me up by my belt for the first three games to keep me from falling over. Now I’m swinging with no assistance. The other activity which I love is kayaking. I’m very fortunate that Team River Runner works with the veterans. We work out in the pool and have gone to the river for the white water experience. Bicycling and bowling are other activities with which I just started getting involved. I want you to know that your life is not over with, but to look forward to the opportunities which await you and all the new friends you will meet. So get involved and plan on getting others involved. At the VA we have a meeting with other amputee vets once a month for sharing and we also have sports clinics throughout the US that we can attend. Disabled athletes sports associations are also great organizations to contact.”
“I will repeat myself because it was so important to me for my recovery. All the steps are necessary, but getting involved with sports will change your whole outlook on life and even put a smile on your face. I have gained my strength and endurance back by swimming with a shinfinTM fin and golf has been the best teacher for learning how to walk with a prosthetic. The nice thing about walking on grass is that if you fall, it’s a soft landing. You will also learn how to get yourself up without assistance and how good it feels to be able to get up without assistance.”
“Adaptive equipment is a term you will learn about. These are devices which either attach to you and/or an object to compensate for your loss of a limb. Your new prosthetic leg is an adaptive devise. Specialized adaptive hardware will allow you to participate in specific sport activities.”
In conclusion
“In closing as I mentioned before, your life has changed. Take this time to rethink your path and enjoy every single day no matter how bleak it seems. I can honestly tell you that a time will come that you will forget that you are wearing a prosthetic leg and you will go on with your life pretty much as you used to. The biggest change for me is that I’m actually enjoying life now. We as humans get so caught up in the ruts of working to support our family that we lose the ability to enjoy life and most importantly to have fun. So my number one advice to you is to get involved with social activities, friends, church, sports, whatever and “have fun”.”
“I hope this brochure has been helpful to you. I’m always conversing with someone or some organization for the disabled regarding the shinfinTM fins and discussing the rehabilitation process. Please feel free to contact me at the email address below.”
“Thank you and best wishes for a speedy recovery,
Bill Wiegand
[email protected]“
Final note
Whether you are an above knee amputee, below knee amputee or foot amputee, I hope Bill’s story about what amputees need to know before or after their amputation, helps you through the learning stages of being a new leg amputee. Perhaps it has also encouraged you to (re)learn how to swim after amputation. If so, please read Bill’s more detailed story about swimming with fins after amputation. You may also like to hear about another above knee amputee customer snorkeling whilst wearing his prosthetic leg. Swimming with shinfinTM fins was one of Bill’s first steps in his return to physical and emotional health.